@interface SampleManagerViewController : UITableViewController
@end
@interface SampleManagerViewController ()
@property (nonatomic, retain) NSArray* dataSource;
@end
- (void)viewDidLoad {
[super viewDidLoad];
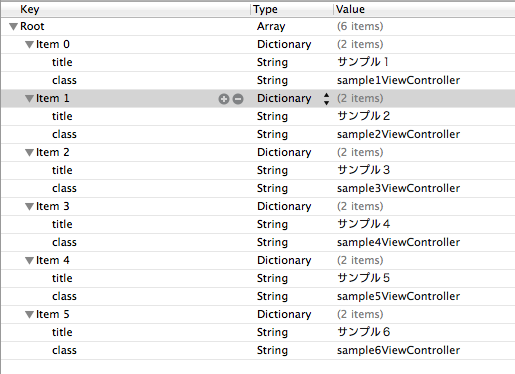
NSString* path = [[NSBundle mainBundle] pathForResource:@"SampleViewControllers" ofType:@"plist"];
self.dataSource = [NSArray arrayWithContentsOfFile:path];
}
- (NSInteger)numberOfSectionsInTableView:(UITableView *)tableView {
return 1;
}
- (NSInteger)tableView:(UITableView *)tableView numberOfRowsInSection:(NSInteger)section {
return self.dataSource.count;
}
- (UITableViewCell *)tableView:(UITableView *)tableView cellForRowAtIndexPath:(NSIndexPath *)indexPath
{
static NSString *CellIdentifier = @"Cell";
UITableViewCell *cell = [tableView dequeueReusableCellWithIdentifier:CellIdentifier];
if (cell == nil) {
cell = [[[UITableViewCell alloc] initWithStyle:UITableViewCellStyleDefault reuseIdentifier:CellIdentifier] autorelease];
}
NSDictionary* dic = [self.dataSource objectAtIndex:indexPath.row];
cell.textLabel.text = [dic objectForKey:@"title"];
return cell;
}
- (void)tableView:(UITableView *)tableView didSelectRowAtIndexPath:(NSIndexPath *)indexPath
{
NSDictionary* dic = [self.dataSource objectAtIndex:indexPath.row];
NSString* className = [dic objectForKey:@"class"];
Class sampleClass = NSClassFromString(className);
UIViewController* sampleView = [[[sampleClass alloc] init] autorelease];
[self.navigationController pushViewController:sampleView animated:YES];
}
#import "SampleManagerViewController.h"
@implementation AppDelegate
- (BOOL)application:(UIApplication *)application didFinishLaunchingWithOptions:(NSDictionary *)launchOptions
{
self.window = [[UIWindow alloc] initWithFrame:[[UIScreen mainScreen] bounds]];
UIViewController* rootView = [[[SampleManagerViewController alloc] init] autorelease];
self.viewController = [[[UINavigationController alloc] initWithRootViewController:rootView] autorelease];
self.window.rootViewController = self.viewController;
[self.window makeKeyAndVisible];
return YES;
}
@end

コメントする